How Storj farming monitoring made me optimize my RPI3 setup?

In the last couple of weeks, I wrote 2 articles about the Storj.io project :

The first explains how to build a farming node with a Raspberry PI and the second how to monitor your node with Grafana.

What I learned from monitoring?

I’m now monitoring my nodes for a few days and noticed some interesting patterns that worth be mentioned.

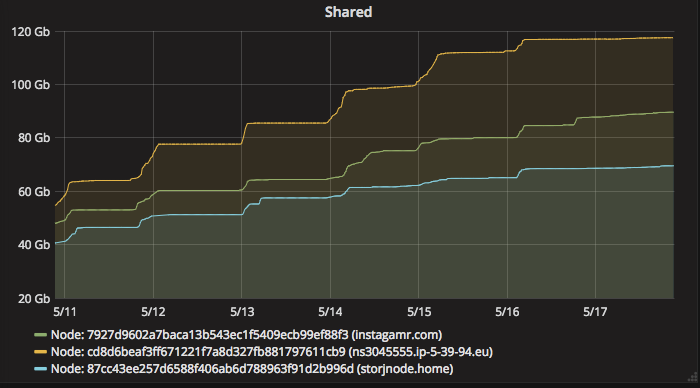
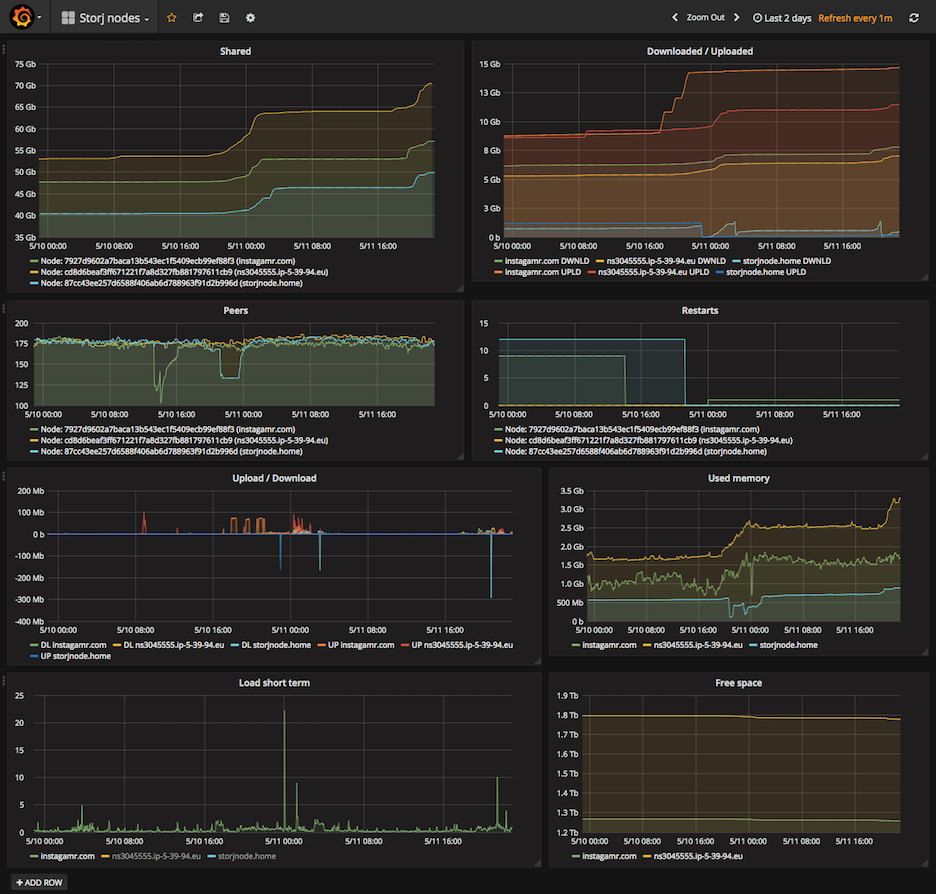
First of all, the sharing amount increase step by step every day on the same period of time, between 10pm and noon in France which basically corresponds to working hours in USA. You can see the beautifull stairs drawn on the graph below:

Shared last 7 days

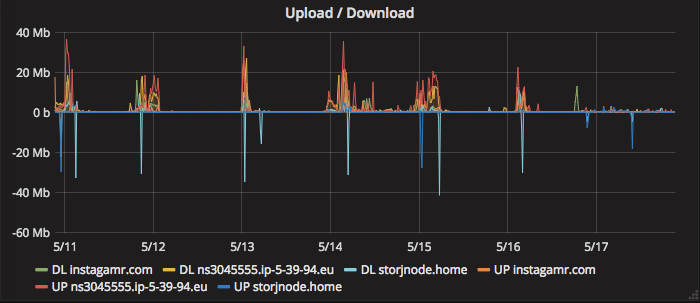
Without surprise, we can also notice this pattern in the Upload / Download rate graph below:

Downloaded vs Uploaded last 7 days

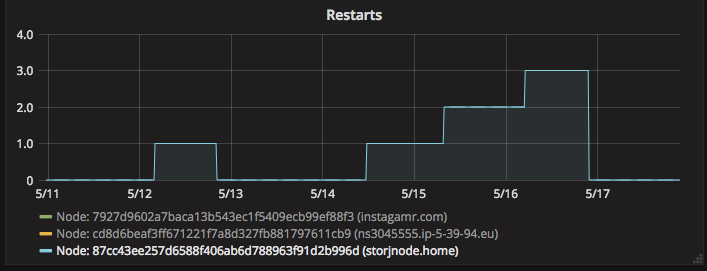
More surprisingly, I noticed that one of my nodes was restarting with the same pattern:

Restarts last 7 days

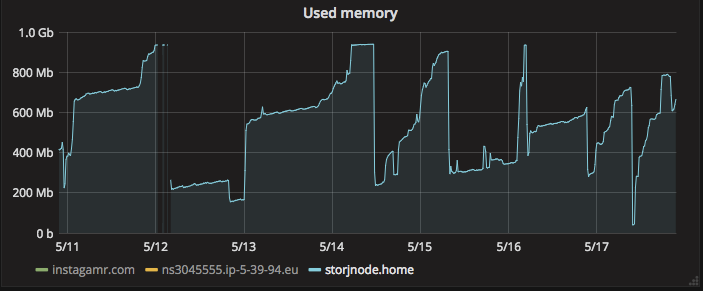
After a bit of inspection, it appears that memory usage hits the limit on download / upload peaks and make Storjshare daemon restart. Of course, the RPI3 memory amount is very limited (1GB of RAM) and the daemon quickly consume all of it when shards are uploaded to the node:

Used memory last 7 days

That is very uncool because, when Storjshare daemon crashes, you potentially loose the current contract and the corresponding data. Loose of contracts means less data, which obviously means, less money!

How to optimize your Raspberry PI for Storj farming?

I presume that you have a Raspberry PI 3, setup with Raspbian Jessie lite (without User Interface). If you don’t, you likely won’t have enough power to host an efficient Storj farming node. To setup Raspbian lite, please refer to the official doc here.

So what now? Is there a way to optimize the Raspberry PI to efficiently farm with Storj? The good news is, you can customize a few things in the RPI « BIOS ».

The closest thing to a traditional BIOS for the Raspberry PI can be found in /boot/config.txt. In that file, you can tweak a lot of parameters, all described here.

To optimize your Raspberry, insert the following lines in your config file:

# Settings to optimize Storj farming
force_turbo=1
boot_delay=1
disable_splash=1

# reduce amount of memory dedicated to GPU
gpu_mem=16

# reduce power consumption
dtoverlay=pi3-disable-wifi
dtoverlay=pi3-disable-bt

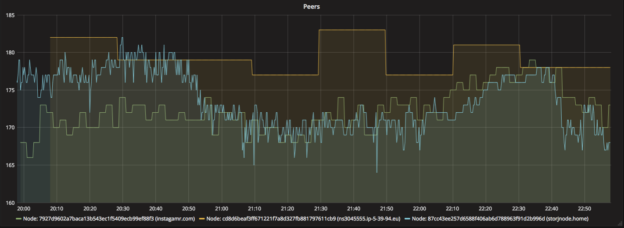
The most interesting parameter is gpu_mem=16. It reduces to a minimum the amount of RAM dedicated to your the RPI GPU which in turns, frees some usefull megabytes for your storjshare-daemon.

Removing Wifi and BT should reduce consumption a little and also deactivate associated services.

Do not forget to reboot your Raspberry PI to see the changes take effect.

Of course, do not install anything else on your Raspberry PI that consume RAM or CPU.

Finally, if you have setup a monitoring solution as I mentionned in one of my previous articles, please be aware that sending metrics with collectd too often is very inefficient and consume a lot of CPU/RAM. You should send metrics at most each 2 minutes in my opinion.

With this config, your farming node should be a lot more stable and efficient. At least, it’s what happened to mine!

Real time monitoring for your Storj farming nodes with Grafana, Influxdb and Collectd

A couple of weeks ago, I put online three Storj farming nodes. Two of them are hosted on my OVH dedicated servers and I even built my own node with Meccano, a Raspberry PI and four old used hard drives.

After putting them online, I found myself connecting every day on those three different machines to run storjshare status, htop, iotop and even ifconfig to gather metrics and understand how my nodes were behaving. While this could be OK at first, this doesn’t seem to be a good solution in the long run.

Monitoring your nodes and their host is really important to help you understand how they perform, how to improve their efficiency over time and of course, being alerted if something goes wrong. As you know, the more your node is online, the more data it will collect.

To simplify the monitoring process, I setup a very classic combination of Grafana, influxdb and collectd. Feel free to replace each one of these components by one of their many alternatives, according to your likings. Have a look at Telegraf for example to replace Collectd.

Setup your Storj monitoring stack

First thing to do is to setup collectd which will be responsible to collect metrics from your host and from storj-daemon RPC port. Assuming your using debian, run the following command:

sudo apt install collectd

Then setup the Storj collectd plugin by running:

npm install -g storj-collectd-plugin

Now, edit config file /etc/collectd/collectd.conf to enable the plugins your interested in. At least, configure the network plugin with the IP address or domain name of the webserver on which you will setup InfluxDB (127.0.0.1 if influxdb is on same host) and add a plugin exec entry for the collectd-storj-exec-plugin:

LoadPlugin ...
LoadPlugin exec
LoadPlugin network

<Plugin network>
  Server "IP_SERVER_INFLUXDB" "25826"
</Plugin>

<Plugin exec>
        Interval 120
        Exec "youruser" "collectd-storj-exec-plugin"
</Plugin>

Finally, add the following lines in /usr/share/collectd/types.db:

peers                   value:GAUGE:0:U
shared                  value:GAUGE:0:U
restarts                value:GAUGE:0:U

Don’t forget to restart collectd service:

systemctl restart collectd

Repeat the operation on every node’s host.

It’s now time to setup influxdb. Assuming your still using debian, run the following commands:

curl -sL https://repos.influxdata.com/influxdb.key | sudo apt-key add -
source /etc/os-release
test $VERSION_ID = "7" && echo "deb https://repos.influxdata.com/debian wheezy stable" | sudo tee /etc/apt/sources.list.d/influxdb.list
test $VERSION_ID = "8" && echo "deb https://repos.influxdata.com/debian jessie stable" | sudo tee /etc/apt/sources.list.d/influxdb.list

sudo apt update && sudo apt install influxdb

See documentation for more informations on the setup process.

Then, enable influxdb collectd listener by adding the following lines in /etc/influxdb/influxdb.conf:

[collectd]
  enabled = true
  bind-address = ":25826"
  database = "collectd_db"
  typesdb = "/usr/share/collectd/types.db"

Restart influxdb:

sudo systemctl restart influxdb

Finally, install Grafana wherever you want by executing:

wget https://s3-us-west-2.amazonaws.com/grafana-releases/release/grafana_4.2.0_amd64.deb
sudo apt-get install -y adduser libfontconfig
sudo dpkg -i grafana_4.2.0_amd64.deb

See documentation for more informations on the setup process.

Build a cool handy dashboard in Grafana

Now that everything is setup, collectd should already be sending metrics to your influx datastore and you should be ready to create your very own dashboard on Grafana.

Here is what mine is currently looking:

And below a few queries I used to build it.

Downloaded vs Uploaded data per host:

Storj peers per node:

Storj shared data per node:

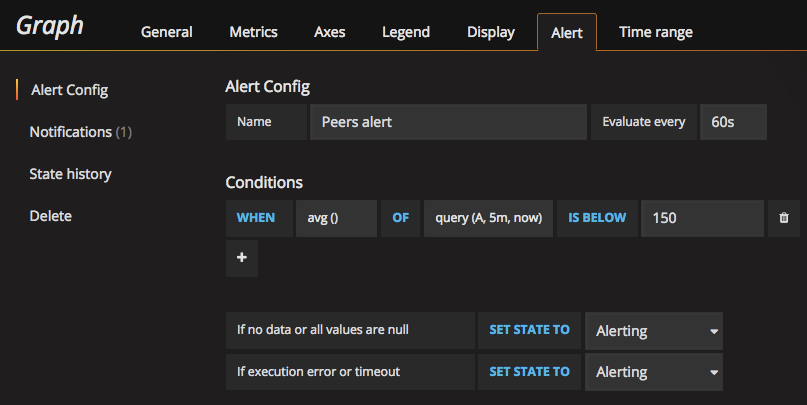
Don’t forget to add alerts on Grafana according to your needs:

After a few days of monitoring, I’m sure you should see interesting patterns emerge from your graphs! Be careful though, it’s quite hypnotic at the beginning 🙂

A few reads that might be interesting

Build your own Storj.io farming node with Raspberry and Meccano

EDIT 04-30-2017

After a chat with the community, it seems that running 4 nodes at the same time on a RPI3 is not efficient on uploads peaks. That’s why I updated my setup to use a union filesystem and make storj-daemon see my 4 hard drives as only one. See the setup below…

What is Storj?

Since a couple of months, a project grabs all of my attention. That’s Storj.io.

If you never heard about it yet, Storj presents itself as a decentralized and encrypted cloud storage system based on blockchain technologies. The press, always optimistic, even names it the Airbnb of cloud storage.

What is it, really? Storj is a network built on top of the equally named protocol, which aims to share extra disk space of individuals all around the world in order to provide a cloud storage system, cheaper and more resilient than Amazon S3 or Google Cloud Storage.

Of course, in exchange of its extra disk space shared accross the Storj network, the user (farmer) earns a couple of bucks each month, depending on the amount of megabytes stored on its disks and the amount of data downloaded and uploaded during the same period.

The vision of Storj is fascinating to me. The developers chose and implemented blockchain technologies at the very heart of the solution, which ease the de-centralization, allow faster data distribution, more resilient network, prevent security issues by encrypting everything and therefore, bring a lot of new features and opportunities to the end users.

Make use of extra disk space of individual could seem a bit surprising first but did you know that most of the personal computers hard drives are just partly used, leaving as much as one trillion gigabytes of space when the entirety of Google is estimated to be 10 to 15 billion gigabytes?! Did you know that a gigantic part of the data a French individual owns is actually stored and retrieved from Ireland (Amazon) or even from US? To store that amount of data, big companies like Google, Amazon, Facebook or Microsoft build massive datacenters absorbing gigawatts of power. And of course, when one of those fail, Internet goes down.

I think what Storj is building is quite similar to what is happening in power production and distribution. With the smart grid concept, we will progressively migrate from a centralized model, which cause around 10 percent of power production loss in transport in France, to a more efficient distributed model.

If you want to learn more about Storj vision, please read the Storj Master Plan. It’s a bit old but still seems quite accurate.

Build your own Storj node

Well, it’s now time to build your own Storj node to share your hard drive and earn a bit of money! In fact, it may be just the right time because StorjLabs company is bout to reveal a partership which should cause a big increase in storage demand!

So, what do you need to build your own Storj.io farming node? In fact, not much, just a computer with unused disk space. But if you want to build a cost efficient solution, always up and running, using something like a Raspberry PI may be a better idea than leaving your Macbook always turned on!

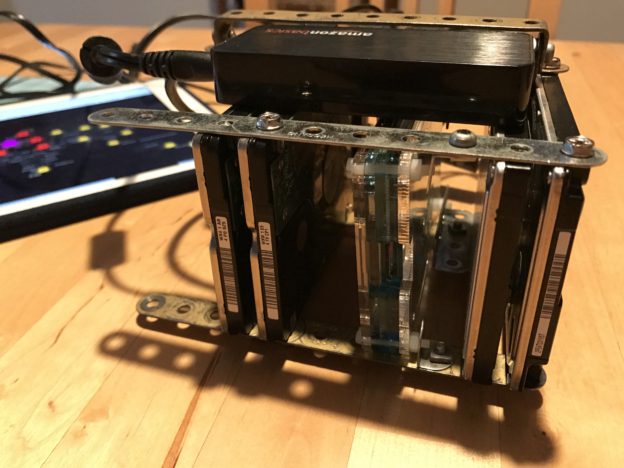
I built my own with the following parts:

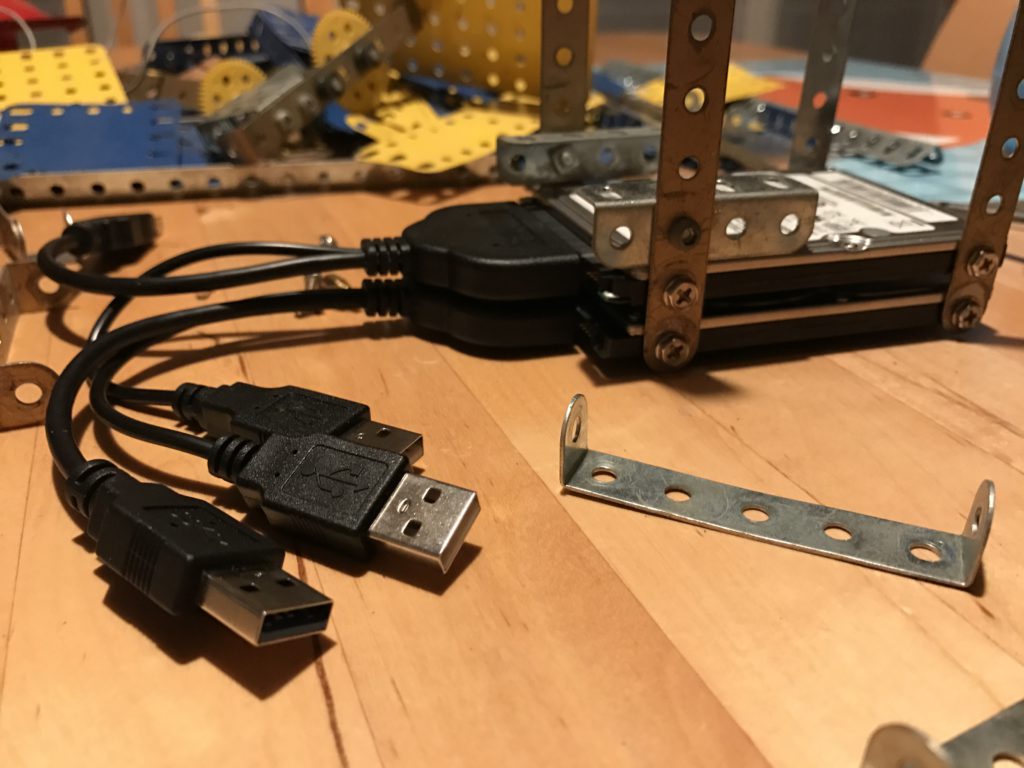
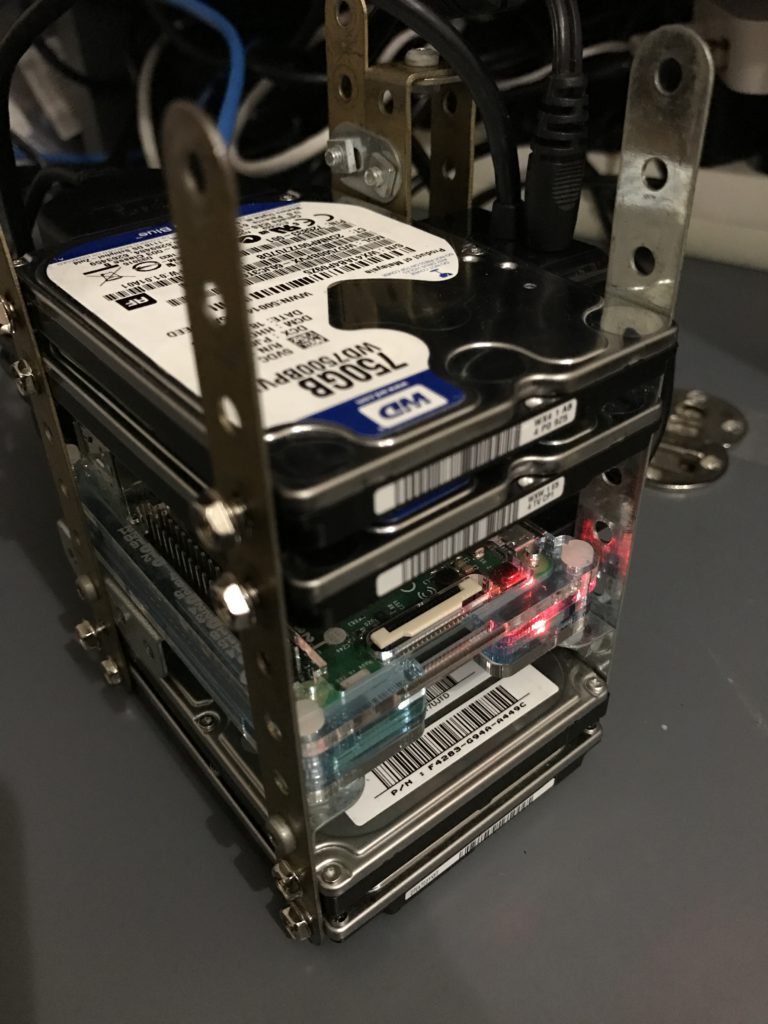
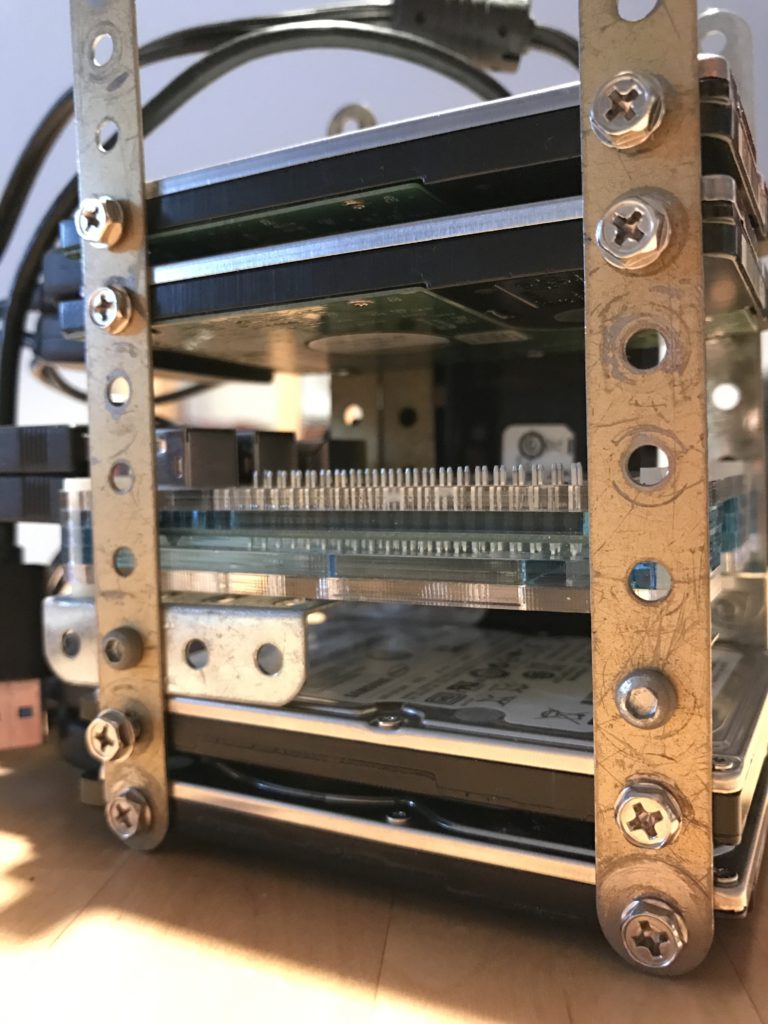
As you can see on the pictures below, the USB hub powers the four hard drives. I used another power supply connected to the Raspberry PI because all USB ports are currently used. But, I think that, with a larger USB hub, I could have powered the RPI directly from it.

The software part is quite simple to setup. First you need to format your hard drives:

parted -a opt /dev/sda mkpart primary ext4 0% 100%
mkfs.ext4 -L storj1 /dev/sda1

parted -a opt /dev/sdb mkpart primary ext4 0% 100%
mkfs.ext4 -L storj2 /dev/sdb1

I chose to mount the four disks in /mnt/storjX. Here is what my fstab is looking:

#/etc/fstab
LABEL=storj1                                      /mnt/storj1      ext4          defaults          0       1
LABEL=storj2                                      /mnt/storj2      ext4          defaults          0       1
LABEL=storj3                                      /mnt/storj3      ext4          defaults          0       1
LABEL=storj4                                      /mnt/storj4      ext4          defaults          0       1
/mnt/storj1:/mnt/storj2:/mnt/storj3/:/mnt/storj4  /mnt/storjmerge  fuse.mergerfs defaults,allow_other,use_ino,fsname=storjmerge  0       0

As you can see on the last line of my fstab, I make use of mergerfs to merge all of my hard drives in a single volume, mounted in /mnt/storjmerge. It’s mostly because Raspberry PI 3 has not enough RAM to run efficiently more than 1 node at once (1GB of RAM seems barely enough while receiving big uploads from peers).

To setup mergerfs on your Raspberry PI 3, run the following:

apt install fuse
wget https://github.com/trapexit/mergerfs/releases/download/2.20.0/mergerfs_2.20.0.debian-wheezy_armhf.deb
dpkg -i mergerfs_2.20.0.debian-wheezy_armhf.deb
rm mergerfs_2.20.0.debian-wheezy_armhf.deb

When the hard drives are setup, you need to install storjdaemon:

npm install --global storjshare-daemon

Then, create the storj node using the following command:

storjshare create --sjcx=YOURSJCXTOKEN --storage=/mnt/storjmerge/storj.io/
...

Then, make a script to start everything at once:

$ cat start-farming.sh
storjshare daemon
storjshare start --config /path/to/storjconfig/xxxx.json

That’s it!

Going further – Interesting reads about Storj

My garage door is accessible through a REST API

First of all, let me confess, the title is a bit sensationalist. A REST API? Yeah that’s quite exaggerated. But yes, I now can send a PUT request to a super mega secret URL from my smartphone and see my building garage door opening almost magically. Still quite cool, uh?
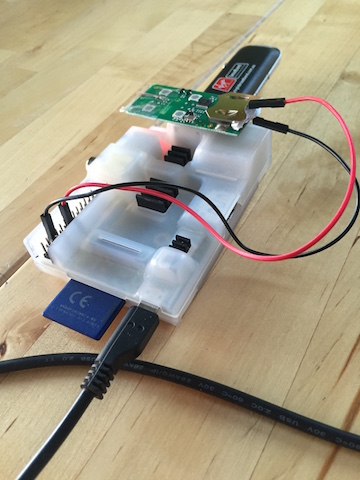
Garage door remote control prototype Raspberry PI

A few words about the project

Those who know me could say how much I love those powerful tiny and yet affordable computers that are Raspberry PI. You didn’t buy one already? Go for it now! Seriously. You don’t know what to do with it? No worries, you can do anything. And if you don’t know yet what to do, that’s the awesome part, you will find something to justify your purchase. The only limit is your imagination and it shouldn’t be limited too much.

OK, a few words about the project. At this point, you should have guessed that it involves a Raspberry PI. What else? Well, the idea is to prototype something that opens my garage door by sending a programmable request across Internet. There are a large number of solutions to solve this problem but I have a few constraints to deal with:

  • My building garage door, in fact, doesn’t belong to me. I can’t make any technical modifications to it and it’s completely excluded to plug cables on existing hardware
  • I don’t have accessible Wifi behind the garage door, but yay, I can access cellular data network
  • And of course, it should be fun and so, combine geeky solutions to solve the problem

Now that we know the constraints, let’s build our solution.

Let’s do it!

Hardware part, DIY

I am a web developer, this part has been the most difficult for me. But also maybe the funniest.

As I said before, I can’t make any modification to the existing garage door hardware. The solution I chose was to use one of the remote control I already had to open the garage door, associated to a pair of the Raspberry PI’s GPIO pins to send the correct radio signal which will open the door. If you don’t know what GPIO are, it stands for General Purpose Input/Output.

Here is a short extract of the official documentation:

One powerful feature of the Raspberry Pi is the row of GPIO (general purpose input/output) pins along the edge of the board, next to the yellow video out socket.

These pins are a physical interface between the Pi and the outside world. At the simplest level, you can think of them as switches that you can turn on or off (input) or that the Pi can turn on or off (output). Seventeen of the 26 pins are GPIO pins; the others are power or ground pins.

What are they for? What can I do with them?

You can program the pins to interact in amazing ways with the real world. Inputs don’t have to come from a physical switch; it could be input from a sensor or a signal from another computer or device, for example. The output can also do anything, from turning on an LED to sending a signal or data to another device. If the Raspberry Pi is on a network, you can control devices that are attached to it from anywhere** and those devices can send data back. Connectivity and control of physical devices over the internet is a powerful and exciting thing, and the Raspberry Pi is ideal for this.

You can get more informations here: https://www.raspberrypi.org/documentation/usage/gpio/

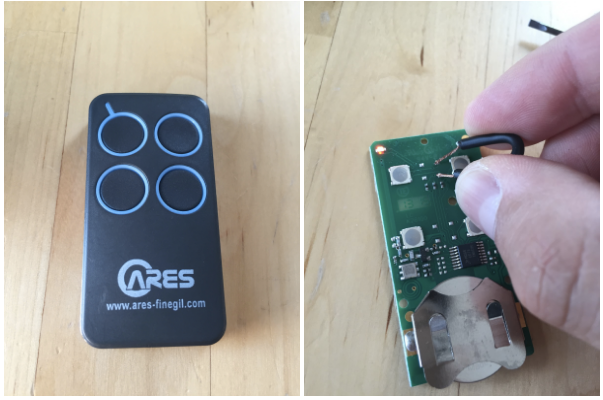
So, here is what my remote control looks like before and after being disassembled:
Badge remote control

Lucky me! First, the remote is powered by a 3V battery which should be easy to replace directly by the Raspberry. Secondly, the printed circuit board and mostly the button part which opens the door seem simple enough to suit my needs in customization.

After a few tries, I found the two weld points I needed to connect in order to simulate a constant push on the opening button. You can see me connecting them in the photo above.
Then I used a few tweaks to replace the battery and use the RPI’s GPIOs as an “on demand” power supply.

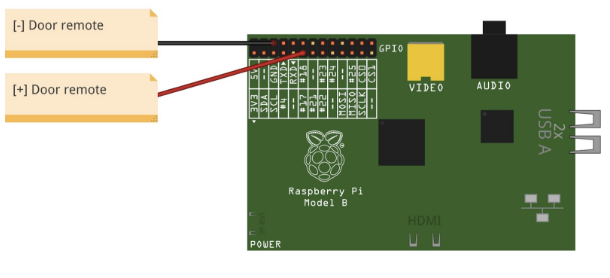
Below is the simplest electronical schema ever which shows the pins I used to connect the PI as a power supply on my remote:
RPI + remote control schema

As you can see, I used the first available 3V programmable output (pin #11) + the ground. That’s it.

Control the hardware

Now that the Raspberry PI is connected and ready to power up the remote, we need to control the GPIOs and see if everything is working as expected.

Again, there are multiple viable solutions to control your GPIO. One of the easiest is to install a utility named wiringPi (http://wiringpi.com) which allows you to read from and write values to the GPIOs, directly from your shell.

Setup can be done using git:

git clone git://git.drogon.net/wiringPi && cd wiringPi
./build

Just try the command gpio readall to see if the setup gone well. If so, you should see a mapping table displaying port by port the current mode (input or output) and the value associated.

Now we need to configure our GPIO #11 (logical port 0) in output mode and send voltage by executing the following commands:

gpio mode 0 out
gpio write 0 1

Yay! The remote led is blinking which means that from my laptop, via an ssh connection, I can now execute a shell command that sends a radio signal to open my building garage door on demand.

API

Now that we can send a radio signal from the PI to open the garage door, we need to create some API endpoint to send that very same radio signal with an HTTP request.

This part is from far the simplest. I used Silex PHP micro-framework and 5mns later everything was working. Of course, you should use whatever language or framework you’re comfortable with as long as you can execute shell commands from your program.

<?php

namespace GarageDoorHacks\Service;

use Symfony\Component\Process\Process;

class DoorService
{
    public function open()
    {
        $initGpioProcess = new Process('gpio mode 0 out');
        $initGpioProcess->run();

        $openCommandProcess = new Process('gpio write 0 1 && sleep 3 && gpio write 0 0');
        $openCommandProcess->run();
    }
}

You can find the complete repository here: https://github.com/bobey/garage-door-hacks

Access it from Internet

OK so, we have a basic API that allows us to control our door remote. Now is the time to make this API accessible through internet. As I said earlier, no trusted wifi is accessible from my garage. No worries, a 3g stick connected to the PI should do the trick.

I used a Huawei e169 well known for its compatibility with Raspbian and the PI. You can find one of those on Amazon for around €30.

To create the connection using GRPS/3G, you have, once again, multiple choices available. I chose to configure manually a new interface using ppp protocol.

To replicate the process, first, add a new network interface as follow:

#/etc/network/interfaces

auto ppp1
iface ppp1 inet ppp
provider sfr

I named my provider sfr because, guess what, I used a SFR sim card. Feel free to name it to whatever provider you wanna use.

Then, add the associated provider configuration in /etc/ppp/peers/sfr as follow:

user "sfr"
connect "/usr/sbin/chat -v -f /etc/chatscripts/gprs -T websfr"
/dev/ttyUSB0
noipdefault
defaultroute
replacedefaultroute
hide-password
noauth
persist
usepeerdns
unit 1

You may need to adapt this configuration to your own setup if you use a different provider. At this point, you should have a 3g interface named ppp1 that you can up or down using ifup or ifdown commands.

If everything work as expected, an ifconfig execution should output something as:

ppp1     Link encap:Point-to-Point Protocol
         inet addr:10.142.77.250  P-t-P:10.64.64.65  Mask:255.255.255.255
         UP POINTOPOINT RUNNING NOARP MULTICAST  MTU:1500  Metric:1
         RX packets:425 errors:37 dropped:0 overruns:0 frame:0
         TX packets:541 errors:0 dropped:0 overruns:0 carrier:0
         collisions:0 txqueuelen:3
         RX bytes:69244 (67.6 KiB)  TX bytes:111932 (109.3 KiB)

You might already know that mobile providers make use of CGN/LSN approach to optimize IPV4 distribution.

If you don’t, think of it as a NAT at large scale. Private IPs are allocated to customers and a network address translator maps multiple private IPs to one public IP. This technique is essentially used by internet providers to mitigate the IPv4 addresses exhaustion.

Like any form of NAT, it breaks the end-to-end principle and so, prevent us to use the public IP associated to our 3g stick to connect directly on our Raspberry, neither access the garage door API.

The once will not hurt, there are many ways to fix that issue all based around the same principle: SSH tunneling.

I already said how much I love the Raspberry and all the things you can do with it. I must say that I love the SSH protocol as well and I could write an entire article just about it. I know, it can sounds weird bug, if you never digged in advanced use cases of SSH, please do it. Tunneling, reverse tunneling, local port forwarding, remote port forwarding, socks proxy are part of the many amazing things SSH come pre-bundled with. And with them, an infinite of solutions to problems you might don’t even know you have 🙂

Here, I used a combination of ssh tunneling + remote port forwarding and a reverse HTTP proxy on my OVH server to make the API hosted on the Pi accessible worldwide. You might also use something like ngrok (https://ngrok.com/) to ease the process if needed.

The interesting part of the setup takes place in /home/pi/.ssh/config:

Host api-tunnel
    HostName      your.server.tld
    User          pi
    Port          22
    IdentityFile  ~/.ssh/id_rsa
    RemoteForward  2280 localhost:80
    ExitOnForwardFailure yes
    ServerAliveInterval 30
    ServerAliveCountMax 3
    StrictHostKeyChecking no
    UserKnownHostsFile=/dev/null

This file allows me to use the following command ssh -T -fN api-tunnel to create a tunnel which forwards my API local port on the public remote server configured.

To make it persistent and easily created at system startup, I used autossh command that you can add with a simple apt-get install autossh.

Then, all you have to do is to setup a reverse proxy (choose haproxy, nginx, apache or whatever solution fits your needs and preferences) on your public server.

And, get to that step, we can place our prototype around the garage door and call our public endpoint with something like curl -X PUT my.awesome.garage.api/door and, finally, tremble with joy while seeing the door opening.

Garage door opening with RPI

To go further

The main disadvantage of the prototype I described here is the fact that your RPI needs a 3g stick and the associated subscription if your garage is not wired with RJ45 network and if you can’t access any trusted wifi from there. This subscription could represents a money problem even if French (in my case) mobile providers such as SFR, Free or most MVNO now come with data plans cheaper than ever.

To fix that issue and build an even greater prototype, one of the first alternatives that comes to mind is a SMS based solution.

The idea is to command the garage door opening by sending a SMS directly to the Raspberry. This solution is quite cheaper of course because you only need a subscription to a mobile phone provider that allows you to receive SMS.

But the really cool part of that alternative is that you could now ask Siri “Please, send a message to My Garage and say ‘open now’” and see the magic happen without the need of developing any web-based interface.

And if you still really want something accessible through a REST API, an hybrid solution based on SMS to control the RPI + an API hosted on your own server should be a perfect alternative. When the API receives an HTTP request it then immediately sends a SMS to the PI via a “Twilio like” service for example. Still really cheap and embeddable in whatever app or service compatible with a REST API (IFTTT, Slack, you name it).

What’s the point, really?

Do I really need to open my garage door from Internet. Not so much actually. A few times a year, when my wife forget its own remote control or when my brother wants to park its moto inside my garage. But I had quite some fun building this prototype.

And after telling some of my colleagues and friends about the project and see their enthusiasm, I’m sure there are a lot of use cases that could be implemented with this kind of solution. Maybe you got one?