First of all, let me confess, the title is a bit sensationalist. A REST API? Yeah that’s quite exaggerated. But yes, I now can send a PUT request to a super mega secret URL from my smartphone and see my building garage door opening almost magically. Still quite cool, uh?

A few words about the project
Those who know me could say how much I love those powerful tiny and yet affordable computers that are Raspberry PI. You didn’t buy one already? Go for it now! Seriously. You don’t know what to do with it? No worries, you can do anything. And if you don’t know yet what to do, that’s the awesome part, you will find something to justify your purchase. The only limit is your imagination and it shouldn’t be limited too much.
OK, a few words about the project. At this point, you should have guessed that it involves a Raspberry PI. What else? Well, the idea is to prototype something that opens my garage door by sending a programmable request across Internet. There are a large number of solutions to solve this problem but I have a few constraints to deal with:
- My building garage door, in fact, doesn’t belong to me. I can’t make any technical modifications to it and it’s completely excluded to plug cables on existing hardware
- I don’t have accessible Wifi behind the garage door, but yay, I can access cellular data network
- And of course, it should be fun and so, combine geeky solutions to solve the problem
Now that we know the constraints, let’s build our solution.
Let’s do it!
Hardware part, DIY
I am a web developer, this part has been the most difficult for me. But also maybe the funniest.
As I said before, I can’t make any modification to the existing garage door hardware. The solution I chose was to use one of the remote control I already had to open the garage door, associated to a pair of the Raspberry PI’s GPIO pins to send the correct radio signal which will open the door. If you don’t know what GPIO are, it stands for General Purpose Input/Output.
Here is a short extract of the official documentation:
One powerful feature of the Raspberry Pi is the row of GPIO (general purpose input/output) pins along the edge of the board, next to the yellow video out socket.
These pins are a physical interface between the Pi and the outside world. At the simplest level, you can think of them as switches that you can turn on or off (input) or that the Pi can turn on or off (output). Seventeen of the 26 pins are GPIO pins; the others are power or ground pins.
What are they for? What can I do with them?
You can program the pins to interact in amazing ways with the real world. Inputs don’t have to come from a physical switch; it could be input from a sensor or a signal from another computer or device, for example. The output can also do anything, from turning on an LED to sending a signal or data to another device. If the Raspberry Pi is on a network, you can control devices that are attached to it from anywhere** and those devices can send data back. Connectivity and control of physical devices over the internet is a powerful and exciting thing, and the Raspberry Pi is ideal for this.
You can get more informations here: https://www.raspberrypi.org/documentation/usage/gpio/
So, here is what my remote control looks like before and after being disassembled:
![]()
Lucky me! First, the remote is powered by a 3V battery which should be easy to replace directly by the Raspberry. Secondly, the printed circuit board and mostly the button part which opens the door seem simple enough to suit my needs in customization.
After a few tries, I found the two weld points I needed to connect in order to simulate a constant push on the opening button. You can see me connecting them in the photo above.
Then I used a few tweaks to replace the battery and use the RPI’s GPIOs as an “on demand” power supply.
Below is the simplest electronical schema ever which shows the pins I used to connect the PI as a power supply on my remote:
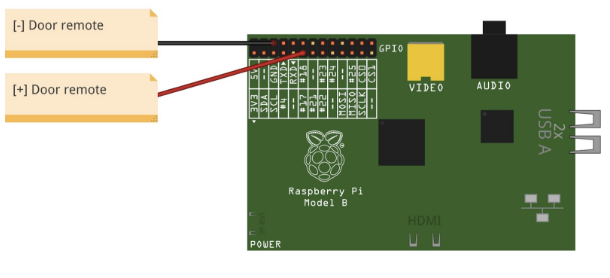
As you can see, I used the first available 3V programmable output (pin #11) + the ground. That’s it.
Control the hardware
Now that the Raspberry PI is connected and ready to power up the remote, we need to control the GPIOs and see if everything is working as expected.
Again, there are multiple viable solutions to control your GPIO. One of the easiest is to install a utility named wiringPi (http://wiringpi.com) which allows you to read from and write values to the GPIOs, directly from your shell.
Setup can be done using git:
git clone git://git.drogon.net/wiringPi && cd wiringPi
./build
Just try the command gpio readall to see if the setup gone well. If so, you should see a mapping table displaying port by port the current mode (input or output) and the value associated.
Now we need to configure our GPIO #11 (logical port 0) in output mode and send voltage by executing the following commands:
gpio mode 0 out
gpio write 0 1
Yay! The remote led is blinking which means that from my laptop, via an ssh connection, I can now execute a shell command that sends a radio signal to open my building garage door on demand.
API
Now that we can send a radio signal from the PI to open the garage door, we need to create some API endpoint to send that very same radio signal with an HTTP request.
This part is from far the simplest. I used Silex PHP micro-framework and 5mns later everything was working. Of course, you should use whatever language or framework you’re comfortable with as long as you can execute shell commands from your program.
<?php

namespace GarageDoorHacks\Service;

use Symfony\Component\Process\Process;

class DoorService
{
    public function open()
    {
        $initGpioProcess = new Process('gpio mode 0 out');
        $initGpioProcess->run();

        $openCommandProcess = new Process('gpio write 0 1 && sleep 3 && gpio write 0 0');
        $openCommandProcess->run();
    }
}
You can find the complete repository here: https://github.com/bobey/garage-door-hacks
Access it from Internet
OK so, we have a basic API that allows us to control our door remote. Now is the time to make this API accessible through internet. As I said earlier, no trusted wifi is accessible from my garage. No worries, a 3g stick connected to the PI should do the trick.
I used a Huawei e169 well known for its compatibility with Raspbian and the PI. You can find one of those on Amazon for around €30.
To create the connection using GRPS/3G, you have, once again, multiple choices available. I chose to configure manually a new interface using ppp protocol.
To replicate the process, first, add a new network interface as follow:
#/etc/network/interfaces

auto ppp1
iface ppp1 inet ppp
provider sfr
I named my provider sfr because, guess what, I used a SFR sim card. Feel free to name it to whatever provider you wanna use.
Then, add the associated provider configuration in /etc/ppp/peers/sfr as follow:
user "sfr"
connect "/usr/sbin/chat -v -f /etc/chatscripts/gprs -T websfr"
/dev/ttyUSB0
noipdefault
defaultroute
replacedefaultroute
hide-password
noauth
persist
usepeerdns
unit 1
You may need to adapt this configuration to your own setup if you use a different provider. At this point, you should have a 3g interface named ppp1 that you can up or down using ifup or ifdown commands.
If everything work as expected, an ifconfig execution should output something as:
ppp1     Link encap:Point-to-Point Protocol
         inet addr:10.142.77.250  P-t-P:10.64.64.65  Mask:255.255.255.255
         UP POINTOPOINT RUNNING NOARP MULTICAST  MTU:1500  Metric:1
         RX packets:425 errors:37 dropped:0 overruns:0 frame:0
         TX packets:541 errors:0 dropped:0 overruns:0 carrier:0
         collisions:0 txqueuelen:3
         RX bytes:69244 (67.6 KiB)  TX bytes:111932 (109.3 KiB)
You might already know that mobile providers make use of CGN/LSN approach to optimize IPV4 distribution.
If you don’t, think of it as a NAT at large scale. Private IPs are allocated to customers and a network address translator maps multiple private IPs to one public IP. This technique is essentially used by internet providers to mitigate the IPv4 addresses exhaustion.
Like any form of NAT, it breaks the end-to-end principle and so, prevent us to use the public IP associated to our 3g stick to connect directly on our Raspberry, neither access the garage door API.
The once will not hurt, there are many ways to fix that issue all based around the same principle: SSH tunneling.
I already said how much I love the Raspberry and all the things you can do with it. I must say that I love the SSH protocol as well and I could write an entire article just about it. I know, it can sounds weird bug, if you never digged in advanced use cases of SSH, please do it. Tunneling, reverse tunneling, local port forwarding, remote port forwarding, socks proxy are part of the many amazing things SSH come pre-bundled with. And with them, an infinite of solutions to problems you might don’t even know you have 🙂
Here, I used a combination of ssh tunneling + remote port forwarding and a reverse HTTP proxy on my OVH server to make the API hosted on the Pi accessible worldwide. You might also use something like ngrok (https://ngrok.com/) to ease the process if needed.
The interesting part of the setup takes place in /home/pi/.ssh/config:
Host api-tunnel
    HostName      your.server.tld
    User          pi
    Port          22
    IdentityFile  ~/.ssh/id_rsa
    RemoteForward  2280 localhost:80
    ExitOnForwardFailure yes
    ServerAliveInterval 30
    ServerAliveCountMax 3
    StrictHostKeyChecking no
    UserKnownHostsFile=/dev/null
This file allows me to use the following command ssh -T -fN api-tunnel to create a tunnel which forwards my API local port on the public remote server configured.
To make it persistent and easily created at system startup, I used autossh command that you can add with a simple apt-get install autossh.
Then, all you have to do is to setup a reverse proxy (choose haproxy, nginx, apache or whatever solution fits your needs and preferences) on your public server.
And, get to that step, we can place our prototype around the garage door and call our public endpoint with something like curl -X PUT my.awesome.garage.api/door and, finally, tremble with joy while seeing the door opening.

To go further
The main disadvantage of the prototype I described here is the fact that your RPI needs a 3g stick and the associated subscription if your garage is not wired with RJ45 network and if you can’t access any trusted wifi from there. This subscription could represents a money problem even if French (in my case) mobile providers such as SFR, Free or most MVNO now come with data plans cheaper than ever.
To fix that issue and build an even greater prototype, one of the first alternatives that comes to mind is a SMS based solution.
The idea is to command the garage door opening by sending a SMS directly to the Raspberry. This solution is quite cheaper of course because you only need a subscription to a mobile phone provider that allows you to receive SMS.
But the really cool part of that alternative is that you could now ask Siri “Please, send a message to My Garage and say ‘open now’” and see the magic happen without the need of developing any web-based interface.
And if you still really want something accessible through a REST API, an hybrid solution based on SMS to control the RPI + an API hosted on your own server should be a perfect alternative. When the API receives an HTTP request it then immediately sends a SMS to the PI via a “Twilio like” service for example. Still really cheap and embeddable in whatever app or service compatible with a REST API (IFTTT, Slack, you name it).
What’s the point, really?
Do I really need to open my garage door from Internet. Not so much actually. A few times a year, when my wife forget its own remote control or when my brother wants to park its moto inside my garage. But I had quite some fun building this prototype.
And after telling some of my colleagues and friends about the project and see their enthusiasm, I’m sure there are a lot of use cases that could be implemented with this kind of solution. Maybe you got one?